MyMentalRay.com
First, before I start todays post, I advise everyone to run over to the freshly updated mymentalray.com which has a brand new fresh coat of paint, an updated material library, dynamic content, and a lot of other spiffy stuff.

Take note especially at the start of the mental ray material library over there. It's not the only effort of it's kind. My pal Jeff Patton is involved with a second very similar effort known as mrmaterials.com.
Simple Layering
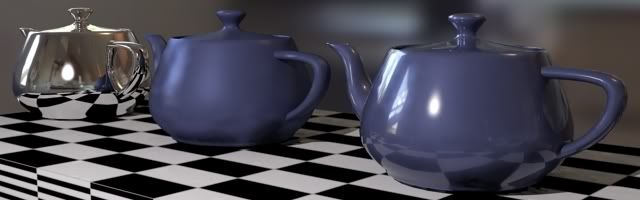
I keep getting questions about layring (probably sparked by the recent writings about Iron Man) where you want to use something like Arch&Design (mia_material) to give both a broad specular glossy highlight, and a 2nd layer of a much more shiny "clearcoat" style material.
Well, nothing is stopping you from doing exactly that. I made this Iron Man material (apologies in advance to Ben Snow, and to all you guys for my lack of modelling sKiLz :) )

This isn't high art, but is there to demonstrate the concept. In most applications like Maya and XSI, you can easily blend materials using various blending nodes. But I did this in 3ds Max, and it's a little bit more difficult in a sense. I used the 3ds Max Blend material for this.
The trick is to understand that the 3ds Max Blend doesn't just *add* two materials (that's what the Shellac does), but it interpolates between them. This is generally better, because you do not break any energy conservation laws! (Also it works with photons that way!). Shellac, while nice, makes it really easy to make nonphysical materials.
However, since you are working with Blend you will have to take this into account. Here is an example:
From left to right:
- Left: A completely mirroring Arch&Design material
- Center: A glossy Arch&Design material in "Metal" mode
- Right: a Blend material using the above two and a Falloff in Fresnel mode as the blend map.
A couple of things to note about this:
- The "common mistake" people do is to make one material that is a shiny material with a falloff for the clearcoat, and completely reflective (glossy) material for the "base" material, and then try to blend these two with Shellac.
This very easily causes nonphysical reasults on edges. Instead doing a Blend between 100% reflective and the "base surface" makes sure to keep the energy in check. - Note that for metallic colored objects, their color does affect the color of reflection, but for dielectric objects the reflection is always white.
You do this by having the "Metal" mode turned on for the base objects (so reflection color is taken from diffuse color) but OFF for the clearcoat (which is a dielectric). This way you get the proper "uncolored" sharp reflections on top of "colored" glossy reflections.
In this particular "Iron Man" material, I also utilized pieces of the car paint shader to get the "flakes" (although the movie version didn't really have any) in the paint. For that I only utilized a single component of car paint (flakes) and had pretty much everything else coming from Arch&Design. For this reason I did use Shellac to layer the car paint with the Arch&Design.

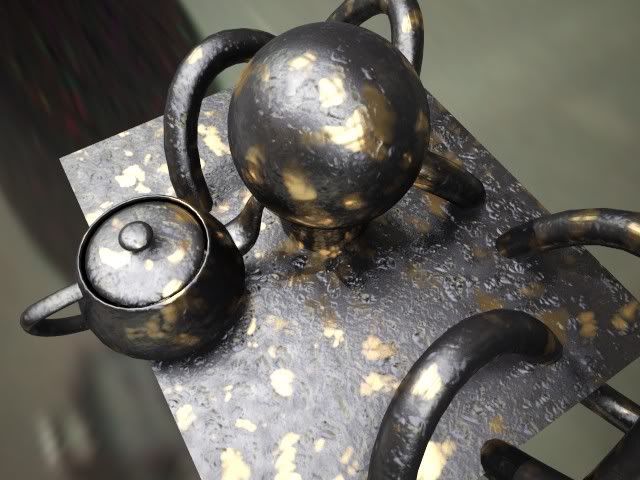
More advanced Layering
This "Blend" technique can be used in multiple layers, witness this (again apologies for my modelling skills :) )

This image originated from a question I got about making "greasy brass", so I made this material (also available on mymentalray.com) which doesn't just blend two things together, but several. Without going too deep into the technique, I am blending between the metal layer, and two different "grease" layers, here with different bump maps.
The trick to keep straight in your head is to make each "layer" look as if it was only made of the given sub-material, and let the blending between the layers handle the weighting (and, unless you "know what you are doing", avoid blendings where they sum up to more than 100%. This is automatic in 3ds Max when using "Blend" but in Maya or XSI - or in 3ds Max when using "Shellac" - it's easy to run amok with the levels)
As always with metal, having something interesting to reflect (i.e. some HDRI environment or similar). But I covered that in an earlier episode (see also here about glossy materials).
...and Other Stuff(tm)
In other news:
- On popular demand I updated the new skinplus.mi file mentioned in a previous post so it now has a special version that does displacement. See the (updated) post.
- For those who has missed it, go over to FXGuide.com where there is lots of cool coverage of the vfx business. Also, if you aren't subscribing to CineFex, well, then you should.
Thanks for listening. As always, following me on Twitter is a great idea, especially as SIGGRAPH draws closer. I'll be Tweeting my location regularly while in L.A.
/Z